Hey hey!! Lets chat about closets, shall we? Some are good, some are bad, most are completely boring. But guess what? Boring isn’t a word in our vocabulary any more alright?
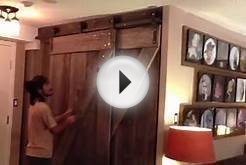
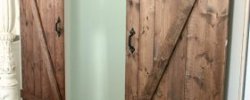
The closet in Ashy’s room is pretty huge. Not walk in huge, but it takes up an entire wall. When we replaced the carpet with hardwood a year ago, we pulled out the bi-fold doors and made the executive decision that we were not allowing them back inside (think hippy chained to an oak tree style). So for a year Ashy’s closet has been open (its a good think my mother in law likes to keep things organized!) When we did my MIL’s office, we build a lightweight sliding barn door out of conduit from the Home Depot, it is still one of my favorite projects. So naturally the urge to do something similar was ginormous. This tutorial piggybacks a lot of what we did for that project, so check that out if you are trying this out. The difference is that Ashy had 2 doors, not one. And so that meant that it had to be a bypass door. Just for fun, Google bypass barn door hardware.
It is as much as a mortgage payment.
Daaaaaang.
Double closet doors are something that a huge amount of us live with, and so a solution was in order. And not the solution of spend all of your grocery money for the next 6 months. After thinking about it long and hard, I feel like we came up with a pretty great, budget friendly solution.
 First things first, lets talk about the doors themselves.
The whole point is to make them as lightweight and sturdy as possible.
Because DIY (at least Vintage Revivals DIY) is full of failures and readjustments I thought you guys might enjoy the real life situation that we had. So lets get that out of the way first, that way there wont be any confusion about the instructions.
When you are creating ideas from scratch sometimes (um…all the time) there can be things that you miss when you are working through the design process. These closet doors had a huge miss. Because I had made the actual door before I used the same measuring technique for these ones. Do you know what that left me with? See if you can guess the problem from the picture below.
2 doors.
No bypass.
A GIANT gaping space. (The doors have to be able to cross in front of each other so one of the doors has to be about 6 inches off of the wall. You could see straight into the middle of the closet from a side view. It was like looking down the barrel of a loaded gun.) Also, I may have cropped out Court’s “ARE YOU FREAKING KIDDING ME?” face from this picture…but I get the feeling that you’ll be able to sense the frustration coming from his hand.
So there are a few things added to this tutorial that are compensating for this little situation I created (I’ll let you know what is of utmost importance!)
 Start by taking 4 measurements.
1. The width of the wall
2. The width of where the closet doors need to be (Make sure that you are accounting for the bypass!) *The actual closet door openings aren’t centered on this wall (look at each corner) But I wanted the doors to be the same size, so they bypass directly in the middle of the entire wall, not necessarily the center of the closet openings.
3. The height of your ceiling.
4. The width from the truss on one side of the wall to the next. We are mounting the hardware into the trusses and they don’t need to be the ones that the walls actually attach to. You can adjust the eyehooks on your doors to compensate for spacing.
The way that we built the doors themselves are part of the string art design. If you aren’t doing something like that on them, I would TOTALLY recommend using this tutorial for the actual door structure.
If you are doing something like the string art, lets get started.
You will need:
Premium 1×4’s for the outer frame
Non-premium 1×4’s for the backside (they’re cheaper!)
4×8’ sheets of underlayment (you can have this cut to size at your local Home Depot if you need to)
Drill and bits
Saw
Nail Gun
(4) eyehooks
(4) 2” fixed wheel casters (make sure that they are fixed, you don’t want the kind that can spin all willy nilly.)
(2) 1/2” Steel Conduit pipes cut and threaded to 2” less length of measurement #4 (Home Depot will cut and thread the pipe for you!)
(4) 1/2” 90 Degree Elbows
(2) 1/2” T fitting
(8) Bolts
(4) 1/2”x1” pipe nipples (these connect the elbows to the T)
(2) nipples that will connect the floor flange to the T fitting (we got a bunch of different lengths and returned the ones we didn’t use) *We ended up using a 3” nipple.
(2) Floor Flanges
Start by measuring and cutting the outer frame of your door. We mitered the edges at 45 degree angles, but you don’t have to if you don’t love that look.
I marked and drilled the holes for the string art (I will go into detail about these measurements and how to in part 2 of this tutorial tomorrow)
Once all of the boards were prepped, we started assembly. We used self drilling wood screws, wood glue, and finishing nails the hold everything together. (Wood glue first, then finishing nails, then a few screws)
We attached both the top and bottom frame pieces to 1×4’s that measure the width of the door.