Get a handle on home improvements, and give an old door a new lease on life. Replacing the handle and lock assembly on a sliding door, or patio door, is a simple project that is suitable for anyone with basic DIY skills, and it is a quick and effective way to turn a house into a home. With the correct handle set and lock assembly, the repair process takes only a few minutes, and has the potential to instantly transform the look of an aging door.
Tools
Replacing a sliding door handle is incredibly simple, and does not require specialist tools or skills. In many cases, it is possible to complete the job using only a basic Phillips screwdriver, although other equipment helps to make the process safer and easier:
- Magnetic Phillips screwdrivers
- Flat screwdriver
- Drill
- Cardboard
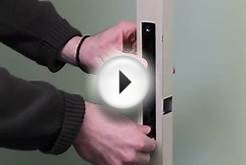
Removing the handle on a sliding door involves removing the exterior and interior handles at the same time. It is difficult to hold two handles safely while removing screws, so it is a good idea to work with a second person to ensure there are no accidents.
Sourcing a Handle
When sourcing a replacement door handle, the most important consideration is the size, as it is essential to get something that fits the existing door. The easiest way to ensure a match is to purchase a handle that is identical to the old handle, or which is a product of the same manufacturer. However, many handles from different manufacturers are interchangeable, especially if they are a similar size. Fitting handles that are a different size may necessitate drilling some new screw holes in the door.
Locks
Many handle sets, particularly for patio doors, work in conjunction with a lock assembly. A new handle may not work with the existing lock assembly, in which case it is necessary to replace the lock as well.
Replacing the Handle
After sourcing new interior and exterior handles and gathering the necessary tools, it is time to start the repair. The exact process depends on the brand of the door and the handles, but in most cases, the repair only involves removing a few screws.
Prepare the Door
Open the door, and lay some thick cardboard on each side to absorb the shock and minimize damage if the handle falls. Secure the door in the open position with a doorstop or a brick, so it does not move around during the repair.
Remove the Screws
Two or more screws secure the handle in place. While holding the handle to prevent it from falling, remove the screws and set them aside. Hold the interior and exterior handles at the same time, and pull them away from the door to remove them.
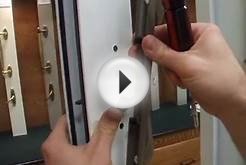
Check the Existing Holes
Check the position of the existing holes in the door, and compare them to the position of the screw holes on the new handle. If they are in the same place, it is easy to fit the new handles. If they are in different positions, use a power drill to make some new holes in the door as required.
Fit the Handles
Position the exterior handle and the interior handle and replace the screws. To minimize the risk of an accident, consider asking an assistant to hold the handles in position. Ensure the screws are tight, and the door handles do not wobble or move while in use. Finally, test the handle and lock to make sure everything is working correctly.