Clean and lubricate the threshold regularly.
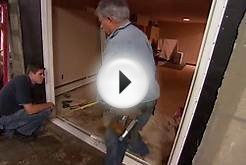
Typical sliding glass doors consist of a stationary panel and a sliding panel that rest on a metallic track threshold. Over time, steel rollers and the lower portions of the door frames can corrode, and the panels must be replaced. You can upgrade the sliding door by installing new panels based on the size of the existing panels. The panels, installation hardware and handles are available in kits at home centers and door outlets. A homeowner should enlist the help of an assistant to install siding glass door panels on a track threshold.
Removing the Panels
Open the sliding panel halfway. Lift up on the edges of the sliding panel and tilt the bottom outward, away from the threshold. Lower the panel until the upper edge is out of the upper track and remove the panel.
Loosen and remove the screws from the upper and lower retainer clips at the outer face and sides the stationary panel frame, using the appropriate size screwdriver.
Insert the tip of a large screwdriver between the outer edge of the stationary panel frame and the threshold. Place a wooden block flat across the threshold below the stem of the screwdriver. Push down on the handle of the screwdriver to dislodge the lower portion of the stationary frame from the threshold.
Grip the outer edge of the frame and pull the panel away from the jamb at the side of the opening. Lift up on the sides of the panel and tilt the bottom outward, away from the threshold. Lower the panel until the upper edge is out of the upper track and remove the panel.
Installing New Panels
Put on safety glasses. Spray a generous amount of lubricant on the threshold from end to end. Remove any corrosion on the raised roller-bead and channels in the threshold with a wire brush. Wipe away the debris and excess lubricant with a rag.
Grip the edges of the new stationary panel and tilt it outward at the bottom and insert the upper edge fully into the track where the old panel was removed. Position the lower edge over the channel at the threshold where the old panel was removed, and lower the panel into place.
Push on the outer edge of the panel and fit the inner edge into the jamb at the side of the opening. Position a wooden block flat against the outer edge of the frame and tap the block with a hammer to fit the inner edge of the panel fully into the jamb.
Fit the hooked end of new retainer clip into the jamb near the inner edge of the stationary frame. Align the machined hole in the clip with the machined hole in the face of the frame. Attach the clip at the frame with the provided screw. Install the remaining clip at the opposite face of the frame in the same way.
Position the sliding panel at the door upright at the opening with rollers at the bottom. The side of the frame with machined holes for the handle must be toward the jamb at the opposite side of the opening as the stationary panel.
Lift the panel and tilt the bottom outward. Insert the upper edge fully into the channel at the upper track where the old sliding panel was removed. Position the lower edge directly over the raised roller-bead at the threshold and lower the panel into place.
Slide the panel open halfway. Refer to the instructions and attach the handle at the machined holes using the provided machine screws.
Grip the handle and slide the door closed. Flip the locking lever down and attempt to pull the door open by the handle. Proceed to the next step if the lock did not engage.
Open the door halfway and use a screwdriver to adjust the alignment of the door. Do this by inserting the tip of the screwdriver into the machined hole at the lower edge of the frame, and rotate the handle one full turn clockwise. Test the lock again. Repeat the adjustment until the lock engages.
Things You Will Need
- Screwdrivers
- Wooden block
- Safety glasses
- Spray lubricant
- Wire brush
- Rags
Tip
- In some cases, it may be necessary to install the rollers into the lower channel of the sliding panel frame. Typical rollers have a metallic frame with a tab that fits into a slot inside the channel. Install a roller with the head of the adjustment screw facing toward the outer edge of the panel and aligned with the adjustment hole at the edge of the door's frame.
- Some manufacturers provide additional retainer clips that install at the outer edge of the stationary frame. Refer to the instructions and install the clips as described.
- Refer to the installation instructions for aligning the sliding panel by adjusting the rollers up or down with the screwdriver.
- On an older threshold, remove burrs from roller-bead with fine-grit sandpaper. Use lubricant and a rag to remove debris from the threshold before installing the sliding panel.
Warning
- Do not break old glass panels for disposal or you risk injury. Enlist a recycling service to haul the old panels to a recycle center.