 Cabinetmakers compare shop-rigged drying racks for freshly-finished parts. March 20, 2006
Question
I can't find the drying racks I've read about on this forum in my 15 lb Hafele Bible. Can someone describe them? I'd also appreciate any suggestions for buying/building racks for drying flat panels.
Forum Responses
(Cabinetmaking Forum)
From contributor T:
The Hafele racks are not in the catalog. I just got mine and put them together today. They look real solid. I called the company and they knew what I was talking about. I think I am going to really like them.
From contributor G:
Here's what I have in my shop. I took a pair of 2x4s and drilled holes in the edge about 5" apart on center and use 3/4" electrical conduit pipe cut to about 24" for rack supports. Drill the holes slightly oversize so the pipes can be removed easy. It's simple, cheap, strong, easy to disassemble, can be mounted on wall or on mobile stands.
From contributor L:
We've got 4 of them. They work fine, good deal. Call your Hafele rep.
From the original questioner:
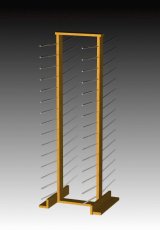
I still don't know what the Hafele rack looks like, but here's a rendering of my first quick and dirty design. Opinions and input welcome. (The finished rack will be on wheels, of course - I just didn't bother to draw them.) I'm thinking of this being built from 2x6's and rigid conduit (as per contributor G's suggestion) for the horizontal supports.
From contributor K:
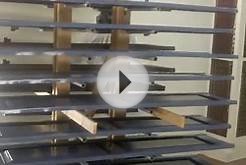
Here is a shot of my shop built rack. It can hold 70 doors or shelves but I usually only load about half that.
From the original questioner:
I like it! There certainly are improvements on my first design - I especially like the center support and removable dowels, which allows the horizontal supports to be adjusted for different length pieces. I also like the idea of angling the vertical members back towards each other so the perpendicular horizontals end up angled a few degrees... without having to drill angled holes. Looks structurally light and strong, too. Curious about a couple of things; what did you use for the rods? (Looks like wood dowels?) In the picture, it looks like the finish is a gloss white? Also, do you find the vertical spacing on the supports user-friendly? (It looks like about 3 inches). Perhaps it's end of the day fatigue, but I always seem to manage to touch the above support when setting a freshly sprayed door in the rack always the front of the door, of course.
From contributor K:
The rods are just 1/2" wood dowels with a sanded bevel on both ends. They work fine and will hold a lot of weight. The rack is just scrap poplar, no finish. My hole spacing was at two inch and it is too crowded. Three or four inch would be better. I just use every other hole and it works fine. The two inch spacing allows for adjustment.
From contributor O:
This is why WOODWEB is so cool. I've been looking for drying racks and ideas for a long time and never have time to finalize what I want to do. Now I know. The adjustable dowel idea is great, as well as the center support for shorter doors. Seems as though my doors end up scattered all over the shop to dry, disabling the shop during the finishing process.
From contributor E:
Buddy of mine put drawer hardware on his racks. They slide in and out.
From contributor N:
What do you guys place the doors on when spraying? I have been using a rotating pedestal that you can spin with your foot while spraying. I am always looking for a better way.
From the original questioner:
Spin with your foot? Well, you're one step ahead of me - I actually have to spin my spray lazy susan setup with my left hand. Seriously, I don't know if a one person spray operation can do any better than a rotating spray stand.
I just took the cushion off an old round office stool and mounted a platform with two triangular sticks on it. It's very stable, height adjustable, and it rolls around if necessary (I made the platform part smaller than most of the pieces I spray to keep material from bouncing back to the underside). It certainly seems easier than my old method of placing multiple items on two stringers perched between two sawhorses. I was always wrestling the gun and hose around, over, under, and generally getting tangled now and then.
From contributor J:
Your design needs cross bracing or it will surely topple.
About what to put doors on when spraying We use nail boards and a turntable. Nailboards are tremendous timesavers and I'm surprised at the number of finish guys that don't even know what they are.
We use 1/2" scrap ply in sizes ranging from 8"x24" to about 16"x36". Drive 1" screws about 2" from each corner. Some of the boards have an additional pair of screws closer to one side (for smaller parts like drawer fronts).
We start by staining the back of the door face down on the bench. Flip the door face up and place it gently on a nail board to stain the front. Flip the door face down again (allowing you to check for drips) and put it on the nail board and onto the rack to dry. Spray the back of the door first. Lift it by its dry edges to flip it face up and put it back on the nail board. Spray the front and edges and lift it by the nail board back onto the rack. This allows you to spray the whole door at once, rather than waiting for one side to dry and handling it twice.
Skeptics will argue that there will be pinholes from the screws on the backs of the doors, and there will. We do only high end work for the most picky and pretentious customers you can imagine, and none have ever noticed or complained about the back of a door.
From contributor A:
I use a couple of food grade stainless racks made for storing cooking trays. These go for $700 a piece, but I found them at a scrapyard for $75 a piece.
I have a separate question. I spray my face frames separately and then attach them to my cabinets. What kind of stands or methods do you have for spraying lots of face frames? Currently, I hang them off of a bunch of 3" screws along one wall of my spray room.
From contributor M:
Get on Hafele's web site and type in product #007.91.079. There's a good picture of the rack there. Their website is extremely difficult to navigate, though, and you will have to register as a customer. The expanding frame is $299 and each additional add-on standard is $99, so you're looking at $500 for a decent sized double loading rack. I think the back side pulls out to so you can stack little panels.
From contributor W:
If you use nail boards and don't like the pinholes from the nail/screw heads, try using more nails/screws. It will distribute the weight of the piece over more nails, lessening how much each nail goes into the piece. It's the same principle as sleeping on a bed of nails... if you sleep on one nail, you're going to get impaled, but on a thousand nails, you can safely do it.
From contributor M:
I use fiberglass rods on my rack system (from Mcmaster Carr Catalog). They are about 20 times stronger than wood and are smooth and easy to clean.
Would you like to
If you have a question regarding...


if it is not finished yet just sand it out,if it is finish then you have to try to heat up the glue try a iron with a rag underneath it, if you can heat it up enough it should wipe off
Answer
if the door is not finished yet then just sand it down, if it is finished then take a iron with a rag underneath it and heat up the glue so you can wipe it off
To save space in a small kitchen, you can conceal wet dish towels in cabinets. Putting a simple bar in a cabinet will hide your wet towels as they dry unnoticed. For those who are energy conscious, installing a drying rack in a cabinet uses less energy than throwing wet towels in the dryer. Homemade drying racks can be made of wood or metal, but using wood eliminates any possibility of rust getting on your towels. Some drying racks fold out and require an open cabinet door, but that defeats the purpose of hiding them.