The homeowners
Robin and Danny, shown here with 1-year-old daughter Samantha, moved into this 1992 house 3-1/2 years ago. With the door finished, they plan to tackle window repairs and then repaint the exterior. That should keep them busy for a while!
Robin and Danny's front door was dented and drafty. They needed a new door, and we needed a place to photograph a door installation story. It was a perfect match. Robin and Danny agreed to install the door themselves with my help. I've installed dozens of doors throughout my carpentry career, so I knew how to guide them through the pitfalls. I have to confess, though, there were a few times when I couldn't resist jumping in to lend a hand. Still, the new homeowners did a great job of tearing out the old door and installing a new one. The new door looked terrific—we were all happy with the results. Here's how we went about the project.
Step 1: Measure the old door and order the new one
Photo 7: Set the door frame
Robin and Danny could rest easy now. The door frame slid into the opening as planned and the heavy-lifting part of the job was done.
 With the old door out and the opening prepared, we were ready to install the new door and sidelight. Before we started, I explained to Robin and Danny that our goal was to set the new door frame in the opening and then adjust it with shims until the door fit perfectly. First we removed all the packing material from the new door and hoisted it into the opening to check the fit. The width was a little tight. We didn't have much wiggle room between the siding and the brick molding, but it was obvious we could make it work. So we removed the door unit and Danny applied heavy beads of polyurethane caulk to the sill and exterior sheathing (Photos 6 and 7). Danny and Robin moved the door to the opening and tilted it into place (Photo 7).
Step 5: Shim, square and fasten the frame
Photo 10: Shim the door frame
Danny slid pairs of shims behind the hinges and along the sidelight on the opposite side. He positioned the shims to create an even gap around the door.
Photo 10A: Close-up of shims
Use pairs of shims to bridge gaps.
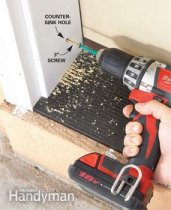
Photo 11: Secure the frame with screws
After checking to make sure the door was contacting the weather stripping evenly and operating smoothly, Danny drilled countersink holes and drove 3-in. screws through the jamb at each shim location. To secure the hinge side, he removed one short screw from each hinge and replaced it with a long screw.
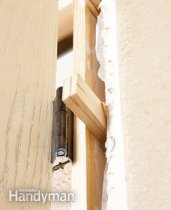
Now we were ready to tack it in and add shims. Shimming a door is the most critical part of the installation since it's when you tweak the frame to make the door fit perfectly and operate smoothly. I helped Robin and Danny center the top of the door frame with an equal caulk space between the siding and the trim on each side, and then tack the two top corners with 16d galvanized casing nails, letting the heads stick out so we could make adjustments later if necessary (Photo 8).
Next, Robin held a level to the hinge-side trim while Danny pried on the frame until the jamb was plumb (Photo 9). We drove another nail at the bottom of the hinge-side jamb to hold the frame plumb. With the door temporarily tacked in place, Danny and I headed around through the back door with a couple of bundles of wood shims. I gave him pointers as he wedged pairs of shims behind the hinges and along the top and far side of the frame. The goal was to create an even gap between the door and the frame (Photo 10). The key to shimming is to look at the gap between the door and the...


Houses !! I only have one house with a green front door,,