 So far this renovation has been one of our easiest—of course much of that can be attributed to the fact that we’ve hired out a lot of the hard labor, but now that we’re in the DIY phase, it was only a matter of time before we ran into a few bumps.
Let me be honest and real for a minute. We are far from DIY professionals—in fact, more than half the time we’re trying something we’ve never attempted before and have no idea what we’re doing. The hope with this blog is to share our experience and encourage those of you who are also unsure of their abilities to get out there and do it—or, learn from our mistakes and do things a different way or hire it out (no shame in that!)
When I started blogging 4 years ago we had nothing more than a crappy battery powered drill and some screwdrivers. We often found ourselves in DIY hell, on the verge of quitting so many times. I’ve finally learned that the key is having the right tools, and time/experience. With experience also comes knowing when a job is too big/technical/time consuming and it’s worth hiring out. Honestly if we could afford to hire everything out, we probably would. We don’t DIY for fun but there’s definitely the reward of personal accomplishment that comes along with it (and every now and then a project is actually enjoyable!)
Moral of the story is… I can share our journey in a handful of words and photos and make it all look quick and easy, but there’s a lot that goes on behind the scenes. And sometimes it really sucks. I don’t want to lead anyone to believe that they can take on more than they can handle and end up with a nightmare project (been there too many times). I aim to be as thorough and honest as possible so you can make those decisions yourself based on your skill level/resources. And please, learn from our mistakes, because we make them all the time.
 Back to our latest project.
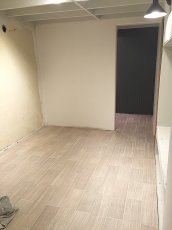
As you may recall, we built this wall and doorway into the storage room:
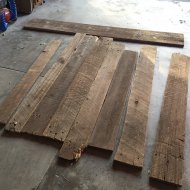
Technically it doesn’t need a door…. but I’ve been obsessing over barn doors for years and this was the perfect opportunity to finally try it out. Brad was fully on board as well so when I came across someone taking apart an old barn down the street, I offered to take some boards off his hands. $20 later and it was all mine:
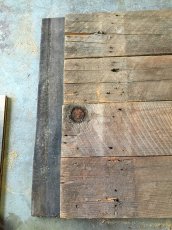
After measuring the door opening and deciding on a door size, I started laying out a few ideas for a door design and came up with this:
The vertical boards were too short to span the full height (around 75″) so I had to place a horizontal board on the top and bottom and extend them out a little to add some height.
First I lined up my vertical boards and trimmed the ragged ends off:
Much better.
Then I grabbed my two horizontal peices and trimmed them to the door width (31″).
To attach the boards, I flipped everything over to hide the screws, and lined it all back up (apparently I missed an important step here which you’ll see in a moment…)
 Once I had everything lined up and triple checked my measurements to make sure everything was square, we drove two screws into the ends of each board.
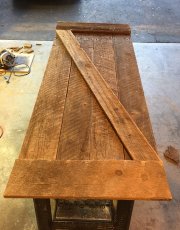
For the cross piece, we set it on top of the door in the position we wanted and marked a cut line.
I used a skill saw to cut the edges. A perfect fit!
With the door raised on sawhorses, Brad was able to get underneath with the drill and screw the cross peice in from the back while I applied pressure from the top.
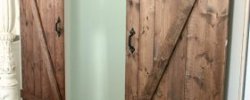
And we had our door!
This is where the easy/fun part ended.
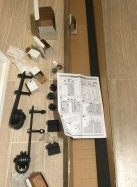
The graphics-only installation guide wasn’t terribly clear and there were a few parts that we still have no idea what their purpose is, but overall it seemed pretty easy and straightforward.
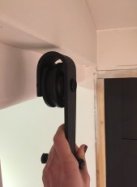
But then as soon as we held the door hanger up we realized we had a major issue…
There was nowhere for the rail to attach to, since the wall didn’t come down far enough (it’s a standard door opening height but the top ran into a ceiling beam so there wasn’t enough flat wall space). After a brief moment of panic and despair, we decided the only solution was to secure a 1×6″ across the top of the wall and attach the rail to that. Brad thought it was going to look ridiculous but I didn’t care—nothing was going to stop me from my barn door dream!
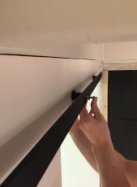
 I promptly ran to Lowe’s to grab the board and once it was hung, we were both relieved when it didn’t look as awkward as we had anticipated (of course it still needed some trim and spackle & caulk to blend in):
Then it was time to mount the rail which presented another problem—the screws they come with are designed to go into a wall, but that wouldn’t work where the 1×6″ was hanging in the doorway since there was nothing on the other side of it. So I had to pick up some bolts, nuts and washers at Lowe’s. Here you can see the screws we used for the wall side in black, and the bolts on the right:
The rail mounts onto spacers so the hanger can slide freely without hitting the wall. We had to make sure each bolt it was 100% perfectly level as we went or else the door would slide on its own:
We made sure to predrill our holes before inserting the screws so the wood wouldn’t split. Here’s the mounted rail:
A quick double check to make sure there was enough room to lift the door on…
Back to the door. After measuring and deciding where I wanted to mount the hangers, we drilled a couple holes for the bolts to pass through.
Then we discovered yet another problem:
The bolts were too long! Not only that, but the lower bolt would need to pass through two layers of wood and it was too short for that:
So it was back to Lowe’s again. Brad picked up two different sizes along with a couple washers and nuts to secure them.
Here’s how it looks from the back:
And finally that part was over…
Now all we had to do was lift it onto the track and hope for the best….!
You guys, it was so crooked.
I’m not sure why it doesn’t really come through in the photo but it was so, so off. We couldn’t figure out where we had gone wrong. All we could do was remove the left hanger hardware, drill new holes and reattach it. That straightened it out but we were left with this uneven gap at the top…


 Portrait photography or portraiture is a photography of a person or group of people that displays the expression, personality, and mood of the subject. Like other types of portraiture, the focus of the photograph is usually the person's face, although the entire...