Traditional Bent Hanger and Modern Flat Barn Door Hardware Install
Tools required for sliding door hardware installation
- drill
- 1/4 inch drill bit (used to drill into your wall)
- 3/8 inch drill bit (used to drill the track and your door) note: preferably standard HSS or cobalt Bit
- Phillips head drill bit
- tape measure
- pencil
- level
- socket wrench and sockets
- hammer
- metal Punch or any type of Nail
Optional
- painters Tape (recommended for kits with a powder-coated finish)
- circular saw (used for cutting groove in the bottom of your door. This is optional depending on choice of floor guide)
Included
1- track
2- pre Assembled door hanger
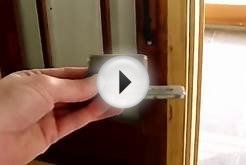
4 -2 inch bolts along with washers and nuts. (for hanger wheel attachment to door)
6- 1 1/2 in spacers (to space track from wall)
6- 5 in lag screws (to anchor track to wall)
2- track stops (to stop the door from rolling off the track)
2- 3/4 inch bolts along with washers and nuts (for attachment of track stops to track)
1- concealed door guide (wood screws for installation)
1- channel door guide
Determining placement *Before track installation you will need to identify secure points to attach your door track. For typical wall installation it is imperative that you install your track by securing your lag screws into the wall studs.
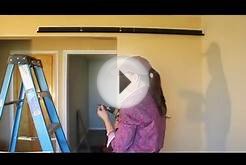
Determine the positioning of your sliding door. Set the door in place and space your door 1/2 inch off the floor (a 1/2 inch piece of leftover building material i.e. plywood / drywall works best. The track you have purchased should be at least two times the size of your sliding barn door. At this point you will need to designate which side you want the door to slide and favor that side when hanging the track. Have an assistant help you hold your track above the door and place one of the door hanger wheels along the track in order to determine the height of the track placement relative to the door. Please note there must be at least 2 1/2 inches of space between the wheel bottoms and the top of the door. Ensure that the track is level and make a faint line at the bottom of the track with a pencil at this height mark (your pilot holes for your lag screws will be placed 3/4 inch above this line) Now you can install.
Track Installation
- Locate the positioning of the lag bolts. Along your height line, mark the locations of your studs. Be sure to make your marks 3/4 inch above this line. This is the location of the pilot holes. Please know that stud locations will vary according to installation.
- Temporarily hold the track above the door. Mark the track with corresponding marks to your pilot hole marks. These marks should be in the center of the track.
- With a 1/4 inch drill bit, drill holes in your wall where your pilot hole marks have been made.
- With a 3/8 inch drill bit, drill the holes in the track where the bolts will be installed, then drill a 3/8 in. hole on the end of each track. (this will be for the track stops). If your metal track has a powder-coated finish, be sure to tape the surrounding areas where your drilling points will be with painters tape in order to prevent shards of metal from scratching the finish.