Rated 5.0 out of 5.0 by eric Met expectations I have three large 33" x 67" west facing panels that provide most of the light in my rental that also let in a bunch of heat in the mid afternoon. Since it is a rental and I know I will be removing it at some point I wanted a cheap way to reduce the heat that the sun pumps into my apartment. It took two tubes and one of the application kits, but I can honestly say the difference is huge. I would get sunburn sitting on my couch before and now it is much more comfortable. April 15, 2016
Rated 5.0 out of 5.0 by mudskipper Great Product Just returned the static cling version of this product and got this version instead and am very happy with the result. Please note though that if you're doing anything bigger than a small/medium window it's much easier to have a helper. :) April 1, 2016
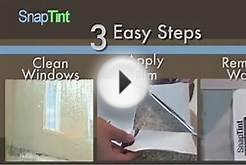
Rated 3.0 out of 5.0 by Tim5307 Works but difficult to install It took me approximately 4 hours to do 6 windows.Use tons of spray solution on both sides of the film and the window. .You can make your own Gila spray solution by putting half a cap full of "baby shampoo" in a quart of water and you are. Set it's cheap, so you don't need to be stingy with the solution. The results are excellent but know this. When you first install there may be some bubbles and a haze but that will clear up in a few days. I'm going to give this product 3 stars only because of the time and difficultly of installation.but when done properly you will be impressed. February 13, 2016
Rated 4.0 out of 5.0 by Dsabes Spray, Spray, Spray That was our mantra for the weekend we installed the tint and was one of the two main factors for an easier install. We chose the Titanium because our master faces west and gets really hot in the summer. We have original 1978 single pane windows that are basically useless and let a lot of heat in and out. Not sure how it works yet because it's November and it has cooled off but we are excited to see if it does what other reviewers have claimed. It's supposed to help keep the winter heat in too. The added bonus in going with the Titanium is that is has a privacy element during the day with a mirrored outside finish and our neighbors can't see in, unless you are right up against the glass peeping in. At night, this goes away, so be sure to close your blinds before you walk around in the buck.people will see you. Be sure to watch the installation video first to get the general idea, then take a look at what worked for us: 1) Use LOTS of spray. Don't be shy and buy multiple bottles. This stuff goes fast. Be sure to spray both the front and back of the tint before you peel away the clear liner. Use lots of spray when peeling off the clear liner and make sure your window is soaked with spray when applying to the window.Spray, Spray, Spray! 2) Try and apply the tint to clean and cool glass. We made the mistake of applying to a west facing window in the afternoon and the spray dried very quickly due to the heat of the glass and we were chasing tiny air bubbles for about an hour. Even though we couldn't get all the tiny ones out, when the tint cured, they did go away and now it looks flawless. But save yourself the time and apply to clean and cool glass by planning your tinting day accordingly per the position of the sun. 3) Make sure you add 1" to the side and bottom of your glass measurement, and then trace out on the tint. Cut precisely and try and use a factory edge on two sides if possible. Remember the old saying "measure twice, cut once". Apply two pieces of scotch tape to one top corner. This makes it easy to separate the tint from the clear film. Watch the video to see how it's done. 4) Spray both sides of the tint and in between the tint and clear liner while separating. Once the clear liner is free from the tint. Generously spray the window and line up the tint to a top and side edge. Press the tint to the glass with your hand, then squeegee out all the big air bubbles working from the top center to the right all the way down, then top center to the left all the way down. 5) Now cut your excess trim. The edge tool they give you in the application package is not very good. We found it much easier to take the yellow squeegee and hold it at a 45 degree angle against the rubber molding of the glass. Take a razor blade and wedge it between the squeegee and the rubber molding where the molding meets the glass. Slide the squeegee down with the razor and your edge comes out very clean. 6) Once the edging is done, spray the window again and squeegee with the lint free white cloth in the application package wrapped around it. Keep at it with the squeegee until all air bubbles are gone. Then go over it once more (no spray this time) with a clean and dry lint free cloth wrapped around the squeegee and you're done! It's a process like anything else and yes, it is tedious but if you take your time, clean your windows well, measure and cut precisely, and use LOTS OF SPRAY. It should come out very nice. Just remember, this is a two person job, so get someone you really like to help as you'll be working in close quarters. And people can see in at night, so close the blinds or put some pants on. November 12, 2015