 Change the frequency switch settings on the motor and your remote control if your remote opens your neighbors' garage doors.
Once your old garage door starts making weird sounds or fails altogether, set aside some time on the weekend to replace it. A replacement garage door opener that matches your current setup offers the quickest and easiest way to get your garage door opener operational again, as you do not need to install new mounting equipment.
Detach the Bracket
Start your garage door replacement project by removing the old one. Look to the end of the rail that hides the screw, belt or chain to find the manual pull handle and the bracket to which it attaches. Remove the bolt and nut or clevis and cotter pin that secure the bracket to the door. Follow the bracket arm up to where it attaches on the rail; remove the bolts and nuts with a ratchet and socket while holding the bolt head with a wrench.
Motor Removal
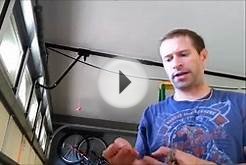
Remove the safety lenses on either side of the door. Unhook the wiring from both at the lens by removing the screws that hold the wires in place. Repeat this step on the motor itself where the wires attach on a series of screws at the top or side of the motor. After completely removing these and the wire that secures to the control unit near the door that enters the house, pull the rail from the bracket above the garage door after removing the fastener that holds it in place. Unbolt the garage door opener from the metal straps or angle iron that anchors it to the ceiling. Set the old motor aside.
Assemble the Rail
The new motor requires some assembly before you install it. Install the first rail - following the manufacturer's instructions - into the motor or power head unit of the garage door opener. Add additional sections, connecting with couplers and the bolts provided with the kit, until the rail is complete. The screw, chain or belt that opens the door sits inside the rail. Add the stop switches to the rail that turn the garage door opener off, one approximately 12 to 14 inches from the motor and the other the same distance from the end of the rail.
Install the New Motor
Install the end of the rail in the bracket that held the old opener above the garage door and secure it with the fastener, bolts or clevis pin. Mount the new motor in the same location as the old one. You might need someone to help hold the motor up while you secure it in place with the bolts and nuts through the metal strap or angled steel. Or set it on two stepladders, one to support the motor and one to support the rail. Make certain the motor and rail are level when you install them. Adjust as necessary by raising or lowering the motor and reattaching it.
Attach the Wiring
Hook up the wiring from the unit to the push button control next to the home entry door. Attach the new wires to the safety lenses with a screwdriver and install them on either side of the garage doors on the mounts for the old lenses. Keep the wires out of the way of the garage door's moving parts. Reinstall the bracket that attaches the rail to the door. Use the old equipment on the door to attach the bracket or install the new following the manufacturer's instructions. Reattach the bracket to the rail. Test the new opener and adjust the stops on the railing as necessary to ensure the door opens and closes properly. Check the safety lenses to ensure they are properly aligned, and adjust as necessary.
Tips and Warnings
Do not reuse the old safety lenses, wires and push button controls from the previous garage door opener, as they may not operate on the same frequency as the ones that come with the new opener. Tools you need include a ratchet and socket, a wrench, needle-nose pliers, screwdriver and stepladder. You can usually leave some of the old brackets in place for attaching the bracket handle to the garage door and rail, along with the brackets that support the safety lenses.


Wayne-Dalton, headquartered in Mt. Hope, Ohio, manufactures consumer door products and accessories, including garage door openers. It released the Quantum series of garage door openers in 2003, but it no longer manufactures this product. You can, however, purchase replacement parts from online third-party vendors. Wayne-Dalton designs its products to last for a long time, but it encourages you to troubleshoot minor issues with your opener if you do have a problem.